What is behavior driven development (BDD)? It is the technique which is emerged from TDD (Test driven development) to bridge the gap between business and technical aspects of a project. BDD uses the simple domain-specific language to express the behavior and the expected results. This kind of technique is considered helpful in cases where the problem space is much complex.
I am going to go over how we can achieve the automation of test scripts using BDD approach in the .Net world. With Visual Studio 2015 you can navigate to the Tools > Extensions and Updates and search for the SpecFlow and install the extension. There is an alternate approach to install the SpecFlow extension is using the NuGet Package manager using the command:
Install-Package SpecFlow -Version <version>
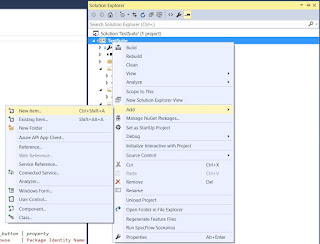
Once the extension gets installed you can add the SpecFlow feature files and the step definition files to your test project as shown below.

The ideal way to create a sample test project is as below:

Components of a basic test project for UI automation should be:
1. Tests - These are the actual test scripts part of your test suite/project
2. Test Mapper (These are basically the mediator between your test scripts and business logic)
3. TestData, Test input files - The input data/files that can be passed to your tests during execution
4. Test Element Repository (Depending on the project you can choose which kind of repository you want to use - it can be xml / json/ excel files.)
5. Utilities - These are basically custom classes that you can use across your test projects like loggers, custom Exception classes, Generic Utils (Mathematical/ File handling/ test data creation etc.)
In case of BDD, the Tests will contain the feature files for your test project/suite. Feature files contain the Feature description, Scenarios (Given, When and Then statements) to form a test case which will internally/ in the background are mapped to the Mapper classes where the business logic exists for that step. Below is the sample feature file for testing a utility home UI:

Here,
Feature: will describe the scenarios/ high-level idea of the Utility.
Scenario Outline: / Scenario: will have the title of test and followed by Given, When, Then statements. Where Given stands for pre-setup/ Pre-requisite for the test. When stands for Action in the test. In case of multiple actions, the And keyword can be used post When statement. Then statement stands for verification part of the test case. In case of multiple verifications, the And keyword can be used post Then statement.
To map the methods/ logic for these steps use F12 and generate the method template automatically and then you can place them under appropriate Mapper classes. In above case, the step Launch Utility was not mapped to any logic/ method. When I generate step definition for it using F12 / right click > generate step definition it shows me the dialog box as below:


I am going to go over how we can achieve the automation of test scripts using BDD approach in the .Net world. With Visual Studio 2015 you can navigate to the Tools > Extensions and Updates and search for the SpecFlow and install the extension. There is an alternate approach to install the SpecFlow extension is using the NuGet Package manager using the command:
Install-Package SpecFlow -Version <version>
Once the extension gets installed you can add the SpecFlow feature files and the step definition files to your test project as shown below.


The ideal way to create a sample test project is as below:

Components of a basic test project for UI automation should be:
1. Tests - These are the actual test scripts part of your test suite/project
2. Test Mapper (These are basically the mediator between your test scripts and business logic)
3. TestData, Test input files - The input data/files that can be passed to your tests during execution
4. Test Element Repository (Depending on the project you can choose which kind of repository you want to use - it can be xml / json/ excel files.)
5. Utilities - These are basically custom classes that you can use across your test projects like loggers, custom Exception classes, Generic Utils (Mathematical/ File handling/ test data creation etc.)
In case of BDD, the Tests will contain the feature files for your test project/suite. Feature files contain the Feature description, Scenarios (Given, When and Then statements) to form a test case which will internally/ in the background are mapped to the Mapper classes where the business logic exists for that step. Below is the sample feature file for testing a utility home UI:

Here,
Feature: will describe the scenarios/ high-level idea of the Utility.
Scenario Outline: / Scenario: will have the title of test and followed by Given, When, Then statements. Where Given stands for pre-setup/ Pre-requisite for the test. When stands for Action in the test. In case of multiple actions, the And keyword can be used post When statement. Then statement stands for verification part of the test case. In case of multiple verifications, the And keyword can be used post Then statement.
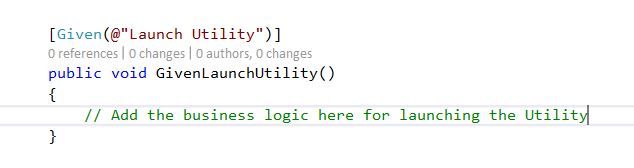
To map the methods/ logic for these steps use F12 and generate the method template automatically and then you can place them under appropriate Mapper classes. In above case, the step Launch Utility was not mapped to any logic/ method. When I generate step definition for it using F12 / right click > generate step definition it shows me the dialog box as below:

Click Yes to copy the step definition to the clipboard and paste it to the appropriate mapper class.
Once the method skeleton gets created for this step you can add the respective business logic for opening the Utility in that method as shown below:
Like this, you can have the complete test created along with other steps and verifications.
As you see the tests are very easy to understand to the non-techie person and he/she can easily get to know/expect what is / should be happening as a part of this step. So this is very much helpful for the business stakeholders/ analysts to correlate the QA scenarios/ test scripts mapped to the requirements.
Once the test scripts are ready you can choose to run it using default MSTest runner/ NUnit or a SpecFlow runner plugin (Can be installed from NuGet).
Comments
Post a Comment